
How to Create Engraved Plaques: Step-by-Step Guide
Over 60 percent of people say personalized awards make recognition more meaningful. Choosing and crafting the right engraved plaque can turn a simple acknowledgment into a cherished keepsake. The right material, design, and technique not only enhance visual appeal but also guarantee lasting durability. Learn which steps matter most so your engraved plaque stands out for all the right reasons.
Table of Contents
- Step 1: Choose The Ideal Plaque Material And Size
- Step 2: Design And Personalize Your Engraving Layout
- Step 3: Set Up Engraving Equipment And Prepare Materials
- Step 4: Engrave The Plaque Using The Selected Method
- Step 5: Inspect And Finish The Engraved Plaque For Quality
Quick Summary
| Key Point | Explanation |
|---|---|
| 1. Choose the right plaque material | Select materials like aluminum for outdoors or stainless steel for modern looks, considering maintenance and aesthetics. |
| 2. Match plaque size to display needs | Choose sizes based on location; smaller for personal use, larger for prominent displays like lobbies. |
| 3. Design layout for clarity and impact | Use appropriate fonts and spacing for readability; create a digital mockup before engraving to ensure balance. |
| 4. Prepare engraving equipment meticulously | Calibrate your machine and secure materials; conduct tests on scrap material to ensure optimal engraving settings. |
| 5. Inspect and finish the plaque thoroughly | Examine for imperfections and apply a protective finish to enhance durability and appearance before display. |
Step 1: Choose the Ideal Plaque Material and Size
Selecting the right material and size for your engraved plaque is a critical first step that determines its aesthetic appeal and durability. Understanding the unique characteristics of different plaque materials will help you make an informed decision that meets your specific recognition needs.
According to heatsign, several materials offer distinct advantages for engraved plaques. Aluminum stands out as a lightweight and corrosion-resistant option perfect for outdoor applications. If you want a modern professional look, stainless steel provides exceptional durability with a sleek appearance. Brass delivers a classic elegant finish but requires more maintenance to prevent tarnishing. For budget-conscious buyers, acrylic emerges as a versatile and cost-effective choice available in multiple colors and finishes.
When considering size, viking-awards recommends selecting based on your intended display location and purpose. Small plaques around 5x7 inches work well for personal awards or youth recognition. Medium sized plaques measuring 8x10 inches offer versatility for most professional settings. Large plaques at 9x12 inches or bigger make powerful statements in lobbies or conference rooms, drawing immediate attention to achievements.
Pro Tip: Always match your plaque material and size to its final environment. An outdoor memorial plaque needs different material considerations compared to an indoor corporate achievement display.
Next, you will learn how to prepare your design and determine the best engraving technique for your chosen plaque material.
Step 2: Design and Personalize Your Engraving Layout
Designing an effective engraving layout is where your plaque transforms from a simple object to a meaningful recognition piece. This step requires thoughtful consideration of typography, spacing, and visual elements that will communicate your message clearly and professionally.
According to trophycentral, creating an impactful engraving layout involves selecting appropriate fonts, sizes, and spacing to ensure readability. When incorporating logos or graphics, balance is key. You want to enhance personalization without overwhelming the plaque. Professional tip: maintain consistency across design elements if you are creating multiple plaques for an organization or event.
Additional design considerations from sign-maker emphasize the importance of matching your design to the plaque material. Different materials like metal, wood, or acrylic will interact uniquely with engraving techniques. For instance, a sleek stainless steel plaque might look best with a modern sans serif font, while a wooden plaque could complement a more traditional serif typeface.
Pro Tip: Always create a digital mockup of your design before final engraving. This allows you to test font sizes, spacing, and overall visual balance without committing to the final product.
Next, you will learn about selecting the most appropriate engraving technique for your chosen plaque material and design.
Step 3: Set Up Engraving Equipment and Prepare Materials
Preparing your engraving workspace and equipment is a critical step that will determine the precision and quality of your final plaque. Success depends on careful setup, attention to detail, and understanding the specific requirements of your chosen engraving method.
According to trophycentral, proper equipment setup involves several crucial steps. Begin by carefully calibrating your engraving machine to ensure absolute accuracy. Secure your plaque material firmly to prevent any movement during the engraving process. Creating a clean workspace is essential clean the engraving area thoroughly and remove any debris that could interfere with your work. Safety should be your top priority wear protective eyewear and ensure the workspace has proper ventilation.
Sign maker recommends paying close attention to material preparation. Each plaque material whether metal, wood, or acrylic requires specific handling. Clean the surface meticulously to remove any contaminants that might impact engraving quality. Take time to select the right engraving tools and adjust machine settings to match the specific properties of your chosen material. This careful preparation will help you achieve optimal depth and clarity in your final design.
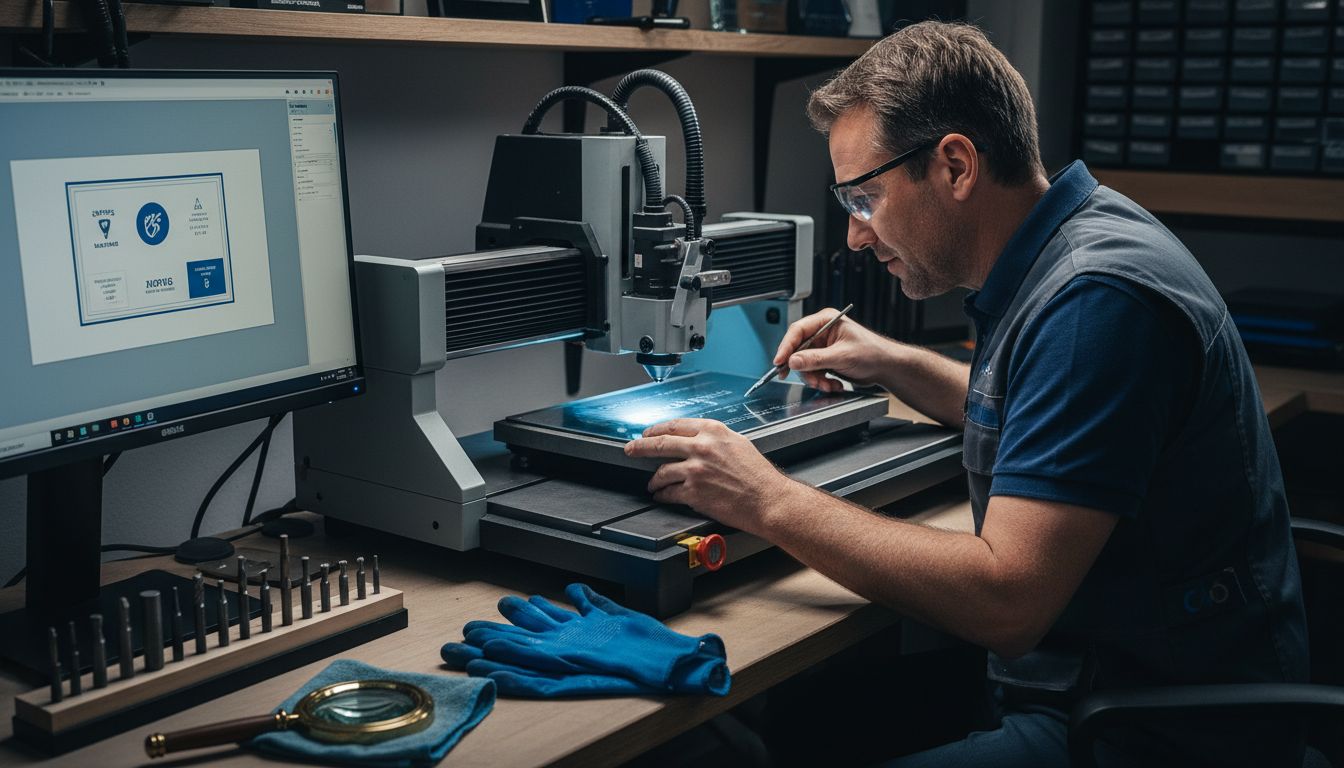
Pro Tip: Always do a test run on a scrap piece of the same material to verify your machine settings and engraving technique before working on your final plaque.
Next, you will learn the specific techniques for executing your engraving with precision and care.
Step 4: Engrave the Plaque Using the Selected Method
With your equipment prepared and design finalized, you are now ready to transform your plaque from a blank surface to a personalized masterpiece. The engraving process requires precision, patience, and a deep understanding of your chosen technique.
According to trophycentral, different materials demand specific engraving methods. Laser engraving works brilliantly for acrylic and wood surfaces, offering incredible precision and clean lines. For metal plaques, rotary engraving with a spinning cutter provides exceptional depth and durability. If you are working with glass or stone, sandblasting creates a beautiful frosted effect that adds a sophisticated texture to your design.
Sign maker emphasizes the importance of carefully adjusting your equipment settings. The speed and power of your engraving tool must match the specific material you are working with. Too much pressure can damage delicate surfaces, while too little will result in a weak or incomplete design. Take your time to make incremental adjustments, testing on scrap material until you achieve the perfect balance of depth and clarity.
Pro Tip: Always start with a test run on a piece of material identical to your final plaque. This allows you to fine-tune your settings and catch potential issues before working on your actual project.
Next, you will learn how to inspect and finish your engraved plaque to ensure a professional final product.
Step 5: Inspect and Finish the Engraved Plaque for Quality
You are now at the critical final stage where precision and attention to detail will transform your engraved plaque from a good project to an exceptional one. This step ensures your hard work culminates in a professional and polished final product.
According to trophycentral, post engraving inspection is crucial. Carefully examine every inch of the plaque for potential errors or imperfections in the engraving. Look closely at the depth of the etching, ensuring consistent lines and clear text. After visual inspection, thoroughly clean the engraved area to remove any residual debris or dust particles that might have accumulated during the engraving process.
Sign maker recommends applying a protective finish to enhance both the appearance and longevity of your plaque. Consider using lacquer or a specialized coating that complements your plaque material. This additional step not only protects the engraving from wear and tear but also adds a professional sheen to your final product. Pay special attention to mounting hardware selection to ensure the plaque can be securely and prominently displayed.
![]()
Pro Tip: Use a magnifying glass or bright light to perform a detailed inspection. Small imperfections that are barely visible at first glance can become glaringly obvious when the plaque is mounted and viewed from a distance.
Next, you will learn about the final steps of packaging and presenting your beautifully crafted engraved plaque.
Transform Your Engraving Vision Into Lasting Recognition
Creating the perfect engraved plaque can feel overwhelming when balancing the choice of materials, engraving techniques, and flawless design layouts. The process demands precision and care to ensure every detail stands out. From selecting the right plaque size and material to final quality checks, you want a seamless experience that delivers professional results without the stress.
At Gino’s Awards Inc., we understand these challenges and provide expertly crafted custom plaques and awards tailored to your exact needs. Whether you seek durable aluminum plaques or elegant brass options with free personalization, we take the guesswork out of design and engraving. Visit our custom awards section to explore a wide range of quality products that honor your achievements with style and precision. Make your recognition moments unforgettable today by starting your order now.
Frequently Asked Questions
What materials are best for creating engraved plaques?
Selecting the right material is crucial for durability and aesthetics. Common options include aluminum for outdoor use, stainless steel for a modern look, brass for elegance, and acrylic for budget-friendly choices. Evaluate your specific use case and environment to choose the most suitable material.
How do I design the layout for my engraved plaque?
To design your engraving layout effectively, choose appropriate fonts, sizes, and spacing that ensure readability. Create a digital mockup to test your design elements and achieve visual balance, making adjustments as needed before finalizing the engraving.
What is the best method for engraving different materials?
Different materials require specific engraving methods for the best results. Use laser engraving for acrylic and wood, rotary engraving for metal, and sandblasting for glass or stone. Ensure your machine settings match the material to achieve optimal depth and clarity in your final design.
How can I inspect the quality of my engraved plaque after completing it?
Inspect your engraved plaque closely for any imperfections or inconsistencies in the engraving. Pay attention to the depth of the etching and clean the engraved area thoroughly to remove any debris. This final inspection ensures a professional finish and highlights any potential issues that need correction.
What protective finishes should I apply to my engraved plaque?
Applying a protective finish, such as lacquer or a specialized coating, can enhance the appearance and longevity of your plaque. Choose a finish that complements your material and apply it after cleaning the engraved area to protect against wear and tear while adding a polished look.
How do I prepare my engraving workspace?
Preparation of your engraving workspace involves calibrating your machine and cleaning the area to avoid interference during the engraving process. Secure your plaque material, wear safety gear, and create an organized workspace to ensure a smooth and precise engraving experience.