


Format Logos for Engraving: Step-by-Step Guide
Table of Contents
- Understanding Vector vs. Raster for Engraving
- Best File Format for Laser Engraving Your Logo
- DPI for Engraving Logos: Resolution Requirements
- Software for Engraving Logos: Tools and Setup
- Step-by-Step: How to Format Logos for Engraving
- Common File Preparation Mistakes and How to Avoid Them
- Material-Specific File Optimization Tips
- Ensuring Your Logo File is Engraving-Ready
Last Updated: July 24, 2026
Understanding Vector vs. Raster for Engraving
When preparing logos for laser engraving, the choice between vector and raster formats determines whether your design will engrave cleanly or arrive with fuzzy edges and quality issues. Vector graphics use mathematical paths to define shapes and scale infinitely without quality loss. Raster images are made of pixels; enlarging them creates jagged, pixelated appearance that ruins fine details. For laser engraving, vector formats are almost always the better choice, producing crisp lines and accurate detail. Raster images work well for photorealistic engravings where tonal gradation matters more than sharp edges.
Why Vector Formats Win for Laser Engraving
Vector files contain no hidden surprises. The laser control software reads the paths directly, translating them into precise cutting or engraving instructions. Hairline details stay hairline, curves remain smooth, and text stays legible at small sizes. Raster images introduce complications: when imported into laser software like LightBurn, the software must interpret pixels as engraving depth, causing subtle color variations to become uneven burn marks and edges to blur. Vector graphics also compress file size dramatically, a complex logo that might be 5 MB as a PNG could be under 100 KB as an SVG.
When Raster Images Work (and When They Don't)
Raster files have legitimate uses for photographic logos or images with gradients and complex color blending. The problem emerges when engraving raster files at high quality. Laser systems interpret grayscale raster images as depth maps: darker pixels burn deeper, lighter pixels barely mark the surface. This fails for logos with solid colors or fine lines, producing muddy results lacking sharp definition.
Best File Format for Laser Engraving Your Logo
SVG, AI, EPS, and PDF: Which Format to Use
SVG (Scalable Vector Graphics) is the modern standard for web and laser applications. It's open-source, widely supported, and stores vector data as clean XML code. LightBurn reads SVG natively.
AI (Adobe Illustrator) is the industry standard for professional graphic design. Ask your designer to send the native AI file rather than an export, as it preserves layers, text formatting, and embedded fonts.
EPS (Encapsulated PostScript) is an older format still widely supported by laser software, handling vector graphics and embedded fonts reliably.
PDF (Portable Document Format) is the safest choice for sending logos to an engraver. PDF preserves vector data, fonts, and layout precisely and is universally compatible with every laser control software.
Exporting and Saving for Maximum Compatibility
When exporting from Adobe Illustrator, use File > Export As and choose SVG, enabling "Convert Text to Outlines" to convert all text to vector paths. For Inkscape, select File > Save As and choose "Optimized SVG (.svg)". For CorelDRAW, use File > Export and select SVG or PDF, enabling "Convert text to curves" in export options. Test your exported file by opening it in a different application to catch export errors before they reach your engraver.
DPI for Engraving Logos: Resolution Requirements
DPI (dots per inch) matters for raster images but not for vector graphics. Vector files contain no DPI value because they're resolution-independent. However, if your logo contains raster elements, photographs, gradients, or complex shading, DPI becomes critical.
Minimum DPI Standards by Material Type
For vector-only logos, ignore DPI entirely. For raster images, minimum standards vary by material:
- Wood and acrylic: 300 DPI minimum
- Metal (anodized aluminum, brass): 600 DPI recommended
- Leather and fabric: 150-200 DPI acceptable
- Stone and marble: 600 DPI preferred
Most engravers will downsample your raster image to 300-600 DPI during processing.
Color Mode and Grayscale Conversion for Clean Results
Raster images must be converted to grayscale before engraving. RGB color mode is designed for screens, not lasers. Convert your image to grayscale yourself in Photoshop, GIMP, or any image editor, giving you control over the conversion algorithm. After conversion, check the image on your screen. Dark areas should be deep black, light areas white or light gray, and midtones should show clear gradation. Avoid pure black and white (0% and 100% values) for photographic rasters; instead use 95% black and 5% white to preserve detail while preventing over-burn. For logos with solid colors, convert to pure black and white (1-bit bitmap) for crisp, professional results.
Software for Engraving Logos: Tools and Setup
Design software (Illustrator, Inkscape, CorelDRAW) is for creation and editing. Laser control software (LightBurn) is for translating your design into laser instructions.
Adobe Illustrator, Inkscape, and CorelDRAW Workflows
Adobe Illustrator: Create or open your logo, then use the Outline Stroke tool to convert all strokes to filled paths. Use the Pathfinder panel to combine overlapping shapes and eliminate stray nodes. Export as SVG or PDF.
Inkscape: Use Path > Stroke to Path to convert all strokes to outlines. Use Path > Combine to merge overlapping shapes.
CorelDRAW: Convert all text to curves (Text > Convert to Curves) before exporting. Use the Combine Shapes tool to merge overlapping objects.
All three software packages allow you to set up layers, essential for multi-pass engraving.
Preparing Files in LightBurn and Laser Control Software
Import your SVG, AI, EPS, or PDF file directly into LightBurn. Verify that all text has been converted to outlines. If text appears as editable text in LightBurn, it hasn't been converted, go back to your design software and convert it to paths before re-importing. Set up your layers in LightBurn to match your engraving plan. Test your settings on scrap material before engraving your final product.
Step-by-Step: How to Format Logos for Engraving
Step 1: Outline All Fonts and Convert Text to Paths
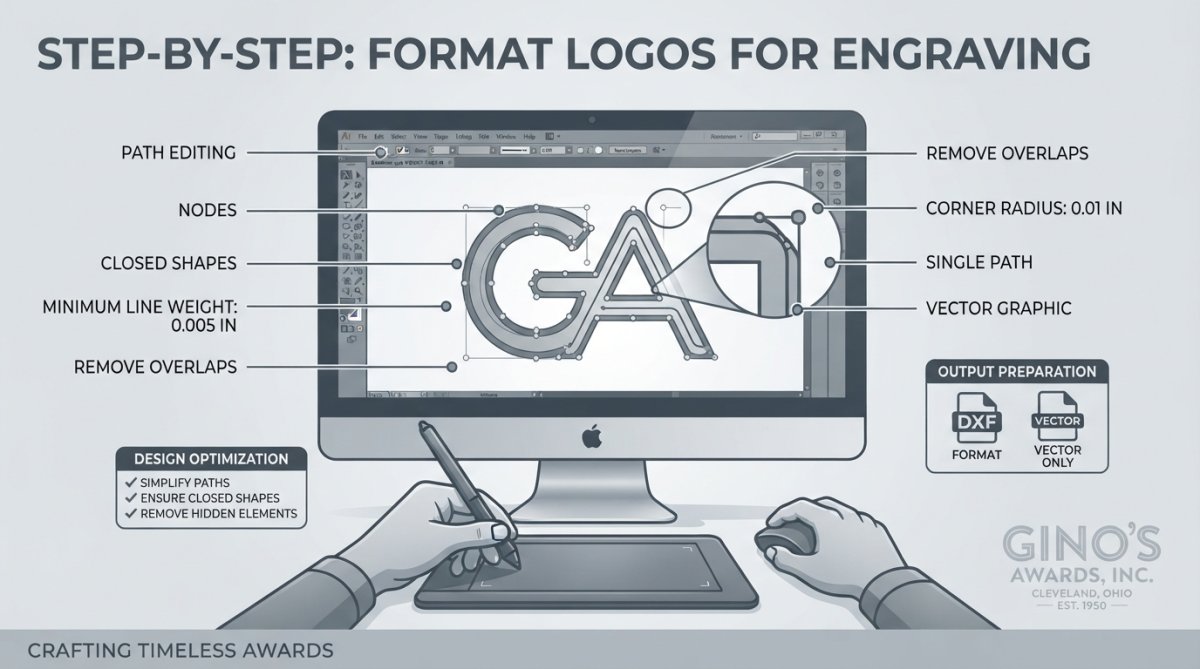
If your logo contains any text, convert it to vector paths immediately. Text is a source of endless problems in engraving workflows because fonts may not be available on the engraver's computer. In Adobe Illustrator, select all text and use Type > Create Outlines. In Inkscape, select text and use Path > Object to Path. In CorelDRAW, select text and use Text > Convert to Curves. After conversion, verify that the text still looks correct and delete any hidden or unused text layers.
Step 2: Set Up Cut Lines, Fill Patterns, and Layer Management
Organize your logo into logical layers before sending it to your engraver. Name your layers clearly: "Text", "Logo Mark", "Border", "Background Fill". For each layer, decide whether it will be engraved (filled) or cut (outline only). If engraving at multiple depths, create separate layers for each depth level.
Step 3: Optimize for Material Type and Engraving Depth
Different materials require different laser settings and file preparation. For wood engraving, use pure black fills and avoid light grays. For metal engraving, increase contrast using pure black for engraved areas and pure white for unengraved areas. For acrylic, you can use lighter grays and gradients. For leather, avoid fine hairlines and use lines at least 0.01 inches thick. Ask your engraver what material you're using, then adjust your logo accordingly.
Step 4: Export and Verify Before Sending
Export your final logo as both SVG and PDF. Before sending, open both files in a neutral viewer to verify they look correct. Check that all text is visible and correctly spelled, shapes are filled or outlined as intended, no stray objects or hidden layers exist, and fine details are visible and not too thin to engrave. Create a simple document listing your logo specifications: material type, desired engraving depth, any color preferences, and dimensions.
Common File Preparation Mistakes and How to Avoid Them
Hairline Strokes, Embedded Fonts, and Bitmap Traps
Hairline strokes are lines thinner than 0.01 inches. They look fine on screen but often disappear during laser engraving. Set minimum stroke width to 0.01 inches for any line you want visible. Embedded fonts look correct when you open the file, but if your engraver doesn't have the same font installed, the software substitutes a default font, ruining your design. Convert all text to outlines before exporting. Bitmap traps occur when you import a raster image into a vector file without properly converting it. If you must include a raster image, convert it to grayscale, embed it properly, and test it in your engraver's software.
Troubleshooting Common Engraving Artifacts
Fuzzy edges appear when vector paths aren't properly closed or when raster images are too low resolution. In your design software, select the shape and use Path > Close Path. Uneven depth happens when your logo contains thin lines next to thick fills. Separate thin and thick elements into different layers and assign different power settings to each. Missing details occur when fine lines or small text are too small to engrave clearly. Increase the size of small elements or simplify fine details.
Material-Specific File Optimization Tips
Wood, Metal, Acrylic, and Leather Preparation Differences
Wood engraving works best with high contrast. Use pure black fills and avoid light grays. Metal requires crisp, high-contrast designs. Gradients and light grays don't show well. Engraved anodized aluminum removes the color coating, revealing bare metal and creating striking contrast. Acrylic is forgiving and allows subtle shading. You can use light grays and gradients. Leather is delicate. Avoid hairline details and very fine text. Use lines at least 0.01 inches thick and text at least 0.25 inches tall. For any material, create a test file with your logo at multiple sizes and engrave a test on scrap material to see how small you can go before details disappear.
Ensuring Your Logo File is Engraving-Ready
Final Checklist Before Submitting to Your Engraver
- All text has been converted to outlines or paths
- No fonts are embedded or required for the file to display correctly
- All strokes are at least 0.01 inches thick (no hairlines)
- All shapes are properly closed (no open paths)
- File is saved as SVG, EPS, PDF, or AI (not JPEG, PNG, or other raster formats)
- If the file contains raster images, they are at least 300 DPI in grayscale
- All layers are named and organized logically
- No hidden or unused layers remain in the file
- File has been tested by opening it in a neutral viewer
- Design is optimized for the intended material
- Logo dimensions match the intended engraving size
- A simple spec sheet accompanies the file
If your logo passes all these checks, it's ready to send to your engraver with confidence. The Gino's Awards, Inc. team processes hundreds of logos monthly, and files that follow this checklist engrave on the first attempt, every time.
When you're ready to bring your engraved awards and plaques to life, Gino's Awards, Inc. handles the entire process from file verification through final production. We've been engraving custom logos since 1950, and we catch file issues before they become expensive mistakes. Our team reviews your logo, confirms it's formatted correctly, and communicates any adjustments needed, all before we touch the laser. With free personalization, fast turnaround times, and on-site manufacturing at our Cleveland facility, we deliver professional results without the wait. Call (216) 831-6565 to discuss your engraving project.
Frequently Asked Questions
What is the best file format for laser engraving a logo?
Vector formats like SVG, AI, EPS, and PDF are ideal for laser engraving because they use mathematical paths that scale infinitely without quality loss. SVG is universally compatible and free; AI and EPS work best in Adobe Illustrator; PDF is excellent for final submissions. Avoid raster formats like JPG or PNG unless converting to vector first, as they pixelate and produce blurry engraving results.
Should a logo for engraving be vector or raster format?
Vector is essential for professional engraving. Vector graphics use scalable paths and nodes that laser cutters read precisely, producing clean, sharp lines regardless of size. Raster images are pixel-based and become blurry when enlarged. If you only have a raster logo, vectorization software can convert it, but native vector files always deliver superior engraving quality and control over laser power and depth.
What DPI is recommended for engraving logos?
For raster images used in engraving, aim for 300-600 DPI minimum. However, vector graphics don't have a DPI setting since they're resolution-independent. If converting raster to vector, start with at least 300 DPI source material. For detailed logos with fine lines, 600 DPI prevents pixelation. Always verify your laser software's DPI requirements; some systems default to 254 DPI, which may need adjustment for crisp results.
How do I convert text to outlines for engraving?
In Adobe Illustrator, select your text, then go to Type > Create Outlines. In Inkscape, select text and choose Path > Object to Path. In CorelDRAW, use Text > Convert to Curves. This converts fonts into vector paths so the engraver doesn't need the original font file installed. Always outline fonts before exporting, this prevents substitution errors and ensures your design looks exactly as intended on the final engraved product.
This article was written using GrandRanker